
Review by: Ernest Engman
Email: sgtrock@hikinghq.net
ICQ#: 27307878
URL: www.hikinghq.net
Backpacking experience: 20+ years in the US Southeast including sections of the
AT, the Pinhoti (Alabama), Sipsey wilderness (Alabama), Mammoth Cave Park
(Kentucky), Mount Eden (Fort Knox, Kentucky); Otter Creek (Kentucky), Bridges to
the Past (Kentucky), and the deserts around El Paso, Texas.
Hammocks used: nylon web hammock and military poncho, Hennessey Hammock (original), and Hennessey Ultralight Hammock.
Locations Tested: Peason Ridge (Louisiana), Wisky Chito Trail, Kistachi
National Forest (Louisiana); Fort Polk (Louisiana).
Conditions tested under: Thunderstorms, insects, temperatures between 85* and
32*, and winds up to 25mph.
Original Review of Hennessey Hammock:
Weight (advertised): 36oz
Weight (tested): 37oz
Price: $99 (REI)
Weight limit: 250lbs
URL: www.hennesseyhamock.com
I love this hammock. It has become my shelter of choice!
Design: Very sturdy and quality construction. The sleeping area is solid nylon
fabric - no catching on stuff like a net hammock, and protects against rain. No-see'um
net full length protects well, and is supported by a line along the length of
the hammock - this makes a great gear loft. I hung my glasses, book, a light,
socks, and the storage bag (using as a gear storage) on it with plenty of room.
The entrance is in the bottom, which seems odd, but it works. You sit in it like
sitting in a chair, then pull you legs in. Then your body weight holds it closed
- along with a couple of pieces of Velcro to make sure you don't roll out at
night.
Sleeping: Because the bottom stakes out with two cords- there is no problem with
flipping, and you can sleep on your side. I slept better in this hammock than I
ever did on a Thermarest!
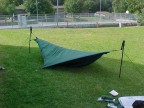
Tarp: comes with a diamond shaped tarp 10' long, and 6' at the wide point. It
covers the entire sleeping area. In good weather it can be left off or pitched
one end up, in bad weather it can be pitched very low to prevent water getting
in. After setting up the hammock, you can also tie both hammock side cords to
one side, and use the underside of the tarp as a covered shelter to cook, eat,
etc. until bed time.
|
|
|
|
Variations: I also have set it up as a bivy, using my trekking poles to support the net/tarp when trees aren't available. In cold weather there are instructions to make a heat reflector using a space blanket and shock cords, but I've found this to be very impractical. Instead I use a 5.5oz (2.25'x6') car shade sun-reflector as a sleeping pad with the shiny side up.
Benefits: No longer need a level ground for a pitch, nor do you need a
sleeping pad or ground cloth. Besides weighing less than a bivy tent, this means
you save 1-2 more lbs based on what type pad you use. No waking up at night
sliding down to the bottom of your tent when you can't find a level spot. No
more finding those mystery roots and rocks after you go to bed. No more
condensation problems. No more water coming in through the floor of your tent in
the rain.
Disadvantages: You can't bring all your gear in like a tent, but what I do is
either put my pack under the center of the hammock with the cover on, or strap
the pack to a tree with the cover on.
Other info: Tom Hennessey is now making an ultra light version that costs $149,
has a weight limit of 200lbs, and will be available in spring. He also has tarp
options, and a nylon webbing strap to prevent tree damage for the "Tree
Huggers". Oh yes, there is also a two person version, a tropical jungle version,
and super light racer versions can be custom ordered.
Final recommendation: Go get one now! I foresee this being the wave of the
future. I will be posting more info here as I test my heat reflector and get
some cool photos of the Hammock in use.
Update 17 December 2000
I recently returned from three weeks in the field using my hammock in
temperatures down below freezing, lowest about 30 degrees. I experimented using
both an Army synthetic 30 degree bag, and my 20+ year old down bag that is on
it's last legs. I recommend the following tips:
1. Go ahead and take some stakes. I carried four, but never used more than two.
It was convenient to have them, and for about 1oz in weight, they were worth it.
2. I tried my car sunscreen heat reflector with great results. I tried it
outside the bag which seems to be warmer but harder to control, and inside the
bag which was easiest to control but not as warm. Apparently to work well, there
should be some insulation between you and the reflector in order for it to trap
warm air created by your body and reflected by the sunscreen. I was warm
everywhere except my butt which was the point of greatest compression on the
sleeping bag. Next trip I intend to try my foam pad that has been trimmed down
to 20"x36" on top of the reflector, all under the bag. I also think it's time to
get a new bag!
3. For best weather (wind and rain) protection, set up in a draw. I set up in a draw with the windward side uphill, the hammock parallel to the draw, and not at the bottom where the runoff will go in case of a hard rain. It was pretty warm and dry under the hammock while changing clothing, cooking, etc.
4. For best sleeping and centering of my body in the bag, I found it helped to set up the hammock with the head 3"-4" lower than the feet.
5. I was contemplating getting a 8'x10' Siltarp to use instead of the standard one, but I found this to be unnecessary after some experimenting. The weight it would have added would be about 8oz for the tarp (leaving the fly behind), 6 stakes - 3oz, and some cord - about 2oz.
Conclusions: For my thru-hike, the ultralight will meet my requirements as shelter and sleeping system once I get a new sleeping bag.
Update 17 January 2001
Review of Ultralight Hennessey Hammock
I Just received my Ultralight Hennessey Hammock today. This report is an initial
inspection report. Look forward to a trip report in the near future.
Weight (advertised): 24oz
Weight (tested): 27oz
Price: $149
Weight limit: 200lbs
As you can tell from my past reviews, I love the Hennessey Hammock, it provides
me all the shelter I want and it also is a better sleep than any Thermarest I've
ever used. Since I'm trying to cut down my pack weight, I was very pleased to
find out about the Ultralight Hennessey Hammock. Saving 10oz to any ultralight
hiker is a great deal!
Here is the story:
Well I didn't find out about the Ultralight until a day or two after receiving
my original Hennessey Hammock from REI. I immediately e-mailed Hennessey
Hammocks asking them when the Ultralight would be available through REI. I told
them I wanted to return my Original and get the Ultralight. Expecting to hear
news from some clerk at the company about how long it would take, that I would
have to return the hammock then wait months for REI to get some, or maybe get
little to no response at all. SURPRISE! Tom Hennessey himself returned my
e-mail!
He told me that REI wouldn't get them until spring 2001, but I could send him my hammock and $49 to exchange for the Ultralight. Boy was I pleased to get this personal attention from the owner of the company.
In my e-mail I had also told them how I used my Hennessey Hammock at work when in the field at Fort Polk. How great his product was for the climate, insects, etc. He told me about a unit here that actually got some from him for field testing (JRTC Operations Group). Too bad I'm not in that unit.
So as a wrap up to the story, Hennessey Hammock's customer service and care for the customer is first rate, great response, and they are definitely behind the product.
O.K. now on to my initial evaluation of the Ultralight.
1. The Sil-Nylon tarp is very light and transparent. I don't see this blocking
much sunlight, which may solve my problem of oversleeping in the mornings.
2. The hammock is about 3oz over the listed weight on Hennessey Hammock's web page. This is in past to adding the tree-hugger webbing straps as standard gear and making the fly slightly larger. I can live with this extra weight for the bonus stuff.
3. The fly. As I mentioned above, the fly is slightly larger. My original fly
was a bias cut coated nylon, 10' along the center line, and 6' at the widest
point. It provided adequate coverage, but I thought it should be a little
bigger, and I even asked Tom Hennessey if they could make custom flies a bit
larger - to which he replied he didn't want to get into the business of making
tarps, who can blame him. When reading reviews at eGroups Backpack Gear Tests,
the larger tarp was mentioned, and I was pleased to see the new tarp is now
about 6.5'x10.5'.
4. The Ultralight has a full length Velcro opening which should ensure 'skeeters and other bugs stay out better. I never had a problem with that in my original model, but it did concern me a bit.
5. Tree hugger Straps included. I had only once left marks on a tree. This was a tree I had hung my hammock on for 4 days straight. Normally I don't stay in a camp that long, so I didn't see tree damage as a problem (Leave No Trace). The Ultralight uses thinner cords which could cause damage faster than the old hammock did, and could also risk getting caught up on bark in some situations. I found the instructions on how to suspend the hammock using the straps a little confusing at first, but it wasn't a show stopper.
6. The ridgeline inside the hammock which supports the mosquito net is also a beefier cord, made from the same material as the hammock suspension ropes. I don't know if this is really necessary, but it may come in handy if you wanted to suspend something heavier than a pair of camp shoes off the ridgeline.
7. Stow sack. There is now a mesh stow sack built onto the ridgeline. The sack has two pockets. The smaller one is about the right size for a mag lite and some other small items. I intend to try putting my LED light in it to try as a reading light hanger. The second pocket is larger, but has a small opening. Part of the larger pocket goes under the smaller pocket. I think I could get glasses, a pen, wallet, knife, etc in this pocket.
8. The main part of the Hammock looks like it is made of the same or a very similar material as the original hammock. I'll research this and include it in my next report.
I just got out of the field here at Fort Polk, LA. Spent the last couple of
weeks doing field training and gunnery, and as always I took the Hennessy
Ultralite to sleep in. Well, about the 2nd or 3rd Day we just started getting
buckets of rain, lightning, high winds, etc. It was so bad at times we had to
stop training. This lasted about 5 days straight. About the 3rd or 4th day of
the storm someone told me we were getting dumped on by some hurricane.
Anyway, people in tents were sleeping in water, had water coming in every
possible hole and crack of vehicles they tried to sleep in, and the mood was
pretty wet and miserable...
Except for me in my Hennessy Hammock! I had set it up and left it up about a
day before the rain started and because I anticipated rain I set it up in my
"storm pitch" in case we got some bad rain. It stayed up for the
entire 5 days of bad weather without getting anything inside wet or blowing down
- except for the one time I kicked a stake out in the middle of the night when
nature called. What really impressed me is I didn't get a chance to find the
optimal pitching spot, but it still did well.
I've been skeptical of the Hennessy's ability to perform in really bad weather,
but now I won't doubt it one bit.
For how to pitch a Hennessy for bad weather:
1. forget the tree hugger straps, the give too much stretch, I'm thinking about
a better way to replace them, maybe a sleeve for the rope to go thru. Tie the
hammock so that there is 9"-12" between the bottom of the hammock and
the ground and the support ropes are as tight as possible.
2. Put the fly as loose between the support ropes as possible. Then pull the
side guys down as far as possible until you cant get them down any further. The
fly should be pulling the centerline down in the middle with a good deal of
tension. Stake the hammock and the fly with the same stake, ensuring they are
both centered up on each other. Then after that is all done, pull tension into
the ends that are along the support rope. Once your done, there will probably
still be some fly folded over on itself in the center, but everything will be
under tension.
3. If possible, put something over the top of the stakes, under heavy saturation
they may try to pull out.
4. The best location is on the back side of a hill, preferably in a draw with
some vegetation in the direction of the wind to help wind block, get the wind to
hit at an angle to the side, with the foot downwind. Even though this is the
preferable place, I was almost directly on a hill top with very little wind
block vegetation, foot into the wind.
I admit I wasn't on the main receiving end of the hurricane, but I doubt any
shelter would stand under that.
Ernest Engman
AKA SGT Rock
sgtrock@hikinghq.net
http://hikinghq.net